wanna get ride of the annoying ads of different websites (facebook, youtube etc)?
install "AdBlock Plus". add-on(mozilla)/extension(chrome).
Sunday, 10 February 2013
Sunday, 30 December 2012
Uninstall Babylon and Babylon toolbar completely
Uninstall Babylon from your system
Open Add or remove programs to uninstall Babylon from your system
- Start → Control Panel → Programs →Uninstall a program.
- In the Add or remove programs list search for Babylon then double click on it to uninstall it.
The Babylon uninstaller will start and you'll see a prompt, like the one below from which you will need to select 'Uninstall'. - After the Babylon uninstall process has completed , in the Add or remove programs list search for Babylon toolbar on IE and then double click on it to uninstall it.


Remove the Babylon residual damage from your browser
- From Internet Explorer
- Open Internet Explorer add-on manager
For Internet Explorer 9 : Click on the gear iconat the top (far right) and click again on Manage add-ons.
- For Internet Explorer 8 : Click on Tools, select Manage Add-ons.
- Select Toolbars and Extensions and disable everything related to Babylon Ltd. from the list (eg : Babylon toolbar, Babylon toolbar helper, Babylon IE plugin, babylonToolbar.com)
- Next,select Search Providers and click on Bing and chose 'Set as default 'to make this search engine your default search provider.
Then select Search the web (Babylon) and click the Remove button to uninstall it. - Click on the gear icon
- Open Internet Explorer add-on manager


- Open Firefox and click on Firefox from the upper left corner
, then select Add-ons
- From the Add-on manager, select Extensions and remove everything related to Babylon Ltd. from the list (eg : Babylon , Babylon Speller and Proofreading, Babylon Translate Activation) then restart your browser.
- On the main window of Firefox , click the small magnifier icon at the right top corner as shown in the image below and select Manage Search Engines.
In the new window, select Search the web (Babylon) and click on Remove and then chose your favorite search engine.Press OK to apply the changes. - Open Firefox and click on Firefox from the upper left corner


- Open Google Chrome and click on the wrench icon
![[Image: chrome_toolsmenu.gif]](//www.google.com/help/hc/images/chrome_toolsmenu.gif) on the browser toolbar.Click Tools and then select Extensions.
on the browser toolbar.Click Tools and then select Extensions. - In the Extensions tab, Remove everything related to Babylon Ltd. from the list (eg : Babylon Translator ) then restart your browser.
- Click the wrench icon on the browser toolbar.Select Options, then click the Basics tab and click on Manage search engines in the"Search" section. Select Search the web (Babylon) from the list and click the X that appears at the end of the row then select Google from the list and make it your default search engine.
- Click the wrench icon on the browser toolbar.Select Options, then click the Basics tab. In the Home Page section enter your favorite website instead of search.babylon.com
![[Image: chrome_toolsmenu.gif]](http://www.google.com/help/hc/images/chrome_toolsmenu.gif) on the browser toolbar.Click
on the browser toolbar.Click 


Sunday, 16 December 2012
show hidden data in your pen-drive
Sometimes you have data in your pendrive but windows explorer dont show anything.
The problem could be because all the data that was present inside the pen drive now have become system files by the virus. This is the reason why they are not visible even with the option “Show Hidden files and folders”.
To remove the problem this is what you need to do.
1. Go to Folder Options -> View tab
2. Make sure that your Show Hidden files and folders option is enabled.
3. Uncheck the option that reads “Hide protected operating system files (recommended)”
Now when you see your pen drive, you will find that your data is present there but in hidden form. There are 2 ways to unhide the data, either right click and uncheck the Hidden box or type in the following command in the command prompt
attrib filename –h –r –s
where filename is the complete location of the file.
Tuesday, 4 December 2012
Some Important Website-: Owner
● Google - : Sergey Brin, Larry Page
● Facebook - : Mark Zuckerberg, Dustin Moskovitz, Chris Hughes, Eduardo Saverin
● Wikipedia - : Jimmy Wales, Larry Sanger
● Youtube - : Steve Chen, Chad Hurley, Jawed Karim
● Twitter - : Evan Williams, Biz Stone, Jack Dorsey
● eBay - : Pierre Omidyar
● Orkut - : Orkut Buyukkokten
● MySpace - : Tom Anderson, Chris DeWolfe
● Friendster - : Jonathan Abrams
● Yahoo - : David Filo, Jerry Yang
● Hotmail - : Sabeer Bhatia
● Wikileaks - : Julian Assange
● Nimbuzz - : Evert Jaap Lugt
Thursday, 22 November 2012
Oracle 11g: Install+Login+Uninstall
Installation
Step 1:
its better to create a drive (>10GB) for Oracle.
Step 2:
run the oracle 11g setup file, then u will see the picture, check 'Advanced Installation', then click 'Next'.

Step 3: Click 'Next' (Enterprise Edition is checked default)

Step 4:
Change installation location, i have created a new drive I, and replace C to I in default directory of Oracle base. Path will be automatically Changed. Click 'Next'.

Step 5:
Check all that is not checked automatically. Click 'Next'.

Step 6:
Click 'Next'. (Create Database is auto selected)

Step 7:
Click 'Next'. (General Purpose / Transaction Processing is selected by default)
 Step 8:
Click 'Next'. (both text-box are filled with 'orcl' by default.
 Step 9:
Click 'Sample Schemas' tab, check 'create database with sample schemas', Click 'Next'.

Step 10:
Click 'Next'.

Step 11:
Click 'Next'.

Step 12:
Click 'Next'.

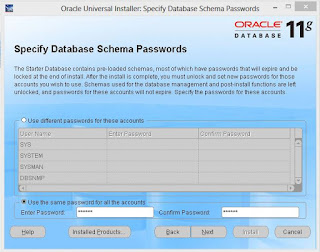
Step 13:
check 'use the same password for all account'. then enter and confirm your password (dont forget the password). Click 'Next'.
Step 14:
Click 'Next'.

Step 15:
Click 'Install'. (if u see 132 product in New installation, then you are done)

Step 16:
Nothing to do :), just watch.

Step 17:
Nothing to do :), just watch.

Step 18:
Nothing to do :), just watch.
 Step 19:
its better to screenshot this page, u need 'The Database Control URL' to login with OEM (Oracle Enterprise Management)
Click on 'Password Management'.

Step 20:
uncheck 'Lock Account' under 'SCOTT'. click 'ok'.

Step 21:
click 'exit'.
you have finished installing successfully.... :)

Login
there are several login progcess for oracle, the most two common process are:
Process 1.
go to your Database Control URL. if you forgot to save the link while installing, don't worry, the link is
https://ip:1158/em or https://host name:1158/em
here, ip is your ip address and host name your host name, you can find your ip/host name writing ipconfig/all in cmd.
use SYS or SYSTEM as your user name.
Process 2:
start>SQL plus. then enter username and password
use SYS or SYSTEM as your user name.
Uninstall
Step1:
goto start>Universal Installer. click 'Deinstall Products'.

Step 2:
mark all check boxes. (to uninstall completely). Click 'Remove'.

Step 3:
Click 'Yes'.

Step 4:
Click 'Yes'.
 Step 5:
click 'Close'.

now you have successfully uninstalled Oracle 11g from your computer.
its better to format your oracle drive.
Step 1:
its better to create a drive (>10GB) for Oracle.
Step 2:
run the oracle 11g setup file, then u will see the picture, check 'Advanced Installation', then click 'Next'.

Step 3: Click 'Next' (Enterprise Edition is checked default)

Step 4:
Change installation location, i have created a new drive I, and replace C to I in default directory of Oracle base. Path will be automatically Changed. Click 'Next'.

Step 5:
Check all that is not checked automatically. Click 'Next'.

Step 6:
Click 'Next'. (Create Database is auto selected)

Step 7:
Click 'Next'. (General Purpose / Transaction Processing is selected by default)

Click 'Next'. (both text-box are filled with 'orcl' by default.

Click 'Sample Schemas' tab, check 'create database with sample schemas', Click 'Next'.

Step 10:
Click 'Next'.

Step 11:
Click 'Next'.

Step 12:
Click 'Next'.

Step 13:
check 'use the same password for all account'. then enter and confirm your password (dont forget the password). Click 'Next'.

Step 14:
Click 'Next'.

Step 15:
Click 'Install'. (if u see 132 product in New installation, then you are done)

Step 16:
Nothing to do :), just watch.

Step 17:
Nothing to do :), just watch.

Step 18:
Nothing to do :), just watch.
its better to screenshot this page, u need 'The Database Control URL' to login with OEM (Oracle Enterprise Management)
Click on 'Password Management'.

Step 20:
uncheck 'Lock Account' under 'SCOTT'. click 'ok'.

Step 21:
click 'exit'.
you have finished installing successfully.... :)

Login
there are several login progcess for oracle, the most two common process are:
Process 1.
go to your Database Control URL. if you forgot to save the link while installing, don't worry, the link is
https://ip:1158/em or https://host name:1158/em
here, ip is your ip address and host name your host name, you can find your ip/host name writing ipconfig/all in cmd.
use SYS or SYSTEM as your user name.
Process 2:
start>SQL plus. then enter username and password
use SYS or SYSTEM as your user name.
Uninstall
Step1:
goto start>Universal Installer. click 'Deinstall Products'.

Step 2:
mark all check boxes. (to uninstall completely). Click 'Remove'.

Step 3:
Click 'Yes'.

Step 4:
Click 'Yes'.

click 'Close'.

now you have successfully uninstalled Oracle 11g from your computer.
its better to format your oracle drive.
Subscribe to:
Posts (Atom)